Water line problems in the house are really annoying. One such annoying problem is when your pressure tank does not fill up with water. However, you’ve got nothing to be worried about because I’m here to explain the solutions to this problem right away.
So, why is my pressure tank not filling up with water? Well, the simple reason behind this is that the bladder/diaphragm of your pressure tank might have accumulated silt. As a result, the diaphragm of the tank might have lost the ability to stretch and shrink properly, causing problems in your pressure tank.
But, this is not the only reason why this phenomenon can arise. There are a bunch of other factors as well that can have a vital role in causing this problem.
So, if you want your pressure tank to effortlessly fill up with water, read my guide here and troubleshoot this problem in no time.
Pressure Tank Not Filling Up With Water: Understanding The Problem

Do you know how a pressure tank works? Let me explain it to you. We generally use a pressure tank for automatic water refilling when the house runs out of water.
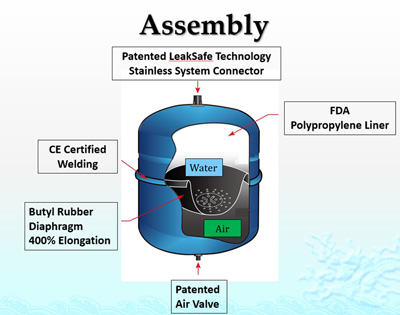
A pressure tank is a reservoir that holds water inside it, but it has a special construction. Inside a pressure tank, there is a diaphragm/bladder made out of elastic materials (see the image below to get a clear understanding).
This particular bladder can stretch or shrink in certain situations. And this diaphragm/bladder plays another important role: it acts as a barrier between air and water inside the pressure tank.
Now, when water fills up the pressure tank, it stretches the bladder up to a certain level. After that, when the bladder has reached its full stretchability, the pressure tank gets the signal to stop taking in water. It does this by sensing the water pressure when the bladder has reached its full stretchability.
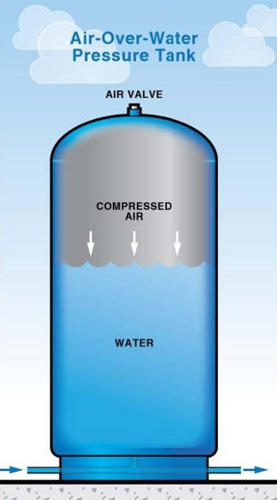
In essence, you should understand that the whole volume of a pressure tank does not ever get filled up with water.
Instead, a pressure tank only gets filled with water up to 70%. And the other 30% remains filled with air.
Now, if the bladder of your pressure tank accumulates silt and other contaminants, it might lose its capability to stretch when necessary. This, in turn, can disrupt the function of the pressure sensor. Resultantly, your water tank might stop refilling water.
Is Your Pressure Tank Really Not Filling Up With Water?
As mentioned above, the pressure tank will never fill up with water. Instead, it might fill up to 70% of the whole volume of the tank. So, if you want your tank to fill up with water, it is impossible to do so.
Now, when you think your pressure tank is not filling up with water, you should try to fill the water inside the tank by touching it with your hand.
More specifically, you must touch the top and bottom portion of the tank surface to ensure that the tank has water.
If you check both ends of the pressure tank by touching it from the outer side and detect that there is no water, then you have a problem.
On the other hand, you might feel that only the top portion of your water tank doesn’t have any water, but the lower portion has. If this is the case, then your tank is working perfectly as it should.
Reasons Why Pressure Tanks Might Not Fill Up With Water (With Solutions)
As I’ve already mentioned above, there can be many reasons why the pressure tank in your house might not fill up with water. For instance:
1. Air Leak In The System:
If the hardware of your water system gets rusty due to old age and develops any air leak, it could lead to loss of pressure. As a result, the general function of your pressure tank might get disrupted for good. In that case, it won’t fill up with water.
Solution:
The solution to this cause is really simple. All you have to do is just locate and plug the air leak. Now, if you have prior experience working with plumbing systems, you can examine various components of the pressure tank system.
Such as, consider checking the pressure tank, water pump, water well, water hose, etc. to find the leak and plug it. Otherwise, get a professional plumber to fix the leak as soon as possible.
2. Defective Bladder:
As you may already know, if your bladder is filled with silt, it will not work properly, causing trouble in refilling the tank. However, the bladder can also get ruptured sometimes due to the overfilling of water. Overfilling can occur due to a malfunction in the pump (that is, feeding water to the tank).
If this phenomenon occurs, the water will not get refilled into the pressure tank at all.
Solution:
Depending on the model of your pressure tank, you might have to replace the bladder, or you might have to replace the whole tank.
So, go ahead and disassemble your pressure tank and see if the bladder is replaceable. If it’s not, you’ll have to replace the pressure tank.
You should always call in a professional to do this for you if you haven’t done it before.
3. Pressure Setting Is Incorrect:
Every pressure tank has a cut-in pressure setting that acts as a trigger for the pump to start pumping water into the tank. For example, imagine that the cut-in pressure is 30 PSI for your pressure tank. In that case, the pump will start pumping water into the tank when the tank pressure gets lower than 30 psi.
On the other hand, the cut-off pressure setting is exactly the opposite of the cut-in pressure. For instance, if the cut-off pressure for your pressure tank is 60 PSI, the pump will stop pumping the water in when your tank pressure reaches above 60 PSI.
Now, the problem arises when the pressure settings get accidentally altered. That’s to say, if the cut-in and cut-off settings of the tanks are not set at optimized levels, the pressure tank might stop filling with water.
Solution:
Check the current pressure setting of your pressure tank when it’s not filling up with water.
To be precise, you have to make sure that the cut-in and cut-off pressure levels are set at the manufacturer’s recommended levels.
You have to especially focus on fixing the cut-in pressure in your pressure tank.
4. Pressure Inside The Tank Has Altered:
Aside from the pressure settings, you also have to make sure that the actual pressure inside the pressure tank is at recommended levels as well.
For instance, if your pressure tank has a cut-in pressure of 30 psi and the pressure inside your tank does not even reach below 32, the pump will not fill up the tank with water. It’s because the cut-in pressure trigger will not work for your tank.
Solution:
Remember, for the pump to start filling the tank with water, the actual pressure inside the tank must be at least 2 PSI below the cut-in pressure setting.
For example, if the cut-in pressure setting is set at 30 PSI, your tank will start filling up with water only when it gets to 28 PSI.
So, what to do? In this case, you would have to check the pressure level of your pressure tank when it’s fully empty.
If you notice the tank pressure is higher than 30 PSI (while the water is emptied out), you would have to release some air. This step will decrease the pressure inside the tank.
Or, if the pressure inside the tank is drastically lower than 30 PSI, you will have to add some air. In turn, the pressure will increase up to the cut-in pressure setting levels.
5. The Pressure Tank Might Be Waterlogged:
An unusual problem that many tank owners face is when their pressure tank is waterlogged. What is waterlogging? Well, it’s the situation when your pressure tank is filled with water, but the water cannot flow to the faucets due to some malfunctioning.
As a result, the water inside the tank stays stagnant, and you cannot get water supply to your faucets despite having water in the tank.
And, when your pressure tank is waterlogged, the pressure environment in the tank also gets messed up. It’s because waterlogging creates an unbalanced air-to-water ratio in the tank.
Consequently, the pump cycle also gets disrupted and the pump cannot fill the tank with new water. In that scenario, you won’t get water in your faucets either.
So, you might think that there’s no water in the tank. However, the reality is that there is water in the tank but it’s stagnant.
In cases like that, the problem worsens if you do not solve it immediately because stagnant water can give rise to the growth of coliform bacteria, algae, and other contaminants.
Plus, when water stays stagnant in your pressure tank, your pump has to run more frequently to provide water supply to your faucets. As a result, the lifespan of your pump deteriorates fast as well.
Solution:
Waterlogging can be caused by bladder rupture. Or, it might also be because of bladder hardening due to silt and mineral accumulation on the bladder.
In addition to that, any leaks or damage in the hardware can also give rise to waterlogging in your pressure tank.
The solution for this is to open up the pressure tank and get rid of all the stagnant water. You will have to utilize the manufacturer’s instruction manual to disassemble each part of your pressure tank.
After that, you’ll have to check each component to identify which ones are providing faulty performance and replace them.
But, if you don’t have any prior experience in doing this, we suggest leaving this to a professional plumber.
How To Do Pressure Tank Bladder Replacement? (8 Simple Steps)
As you can already guess from the above discussion, the main reason why a pressure tank stops filling with water is a damaged bladder. So, you will most likely have to solve this issue by replacing the tank bladder.
But, how to do that? Well, I’ve broken down the steps to a pressure tank bladder replacement right below. You can follow the steps I have mentioned here to easily replace the tank bladder in your pressure tank.
So, let’s get to it right away:
Step 1:
First off, you’ll have to uninstall the valve cap from your pressure tank and disassemble the valve core as well. Doing this will discharge the air from the pressure tank.
Step 2:
Now, you’ll have to be careful and lay down the pressure tank on its side surface. After that, you’ll easily be able to drain any existing water from it.
Step 3:
At this point, you’ll have to remove the elbow (if it has one) from your pressure tank’s draw-in opening. Next, you will also have to take apart the jam nut from the opening.
Step 4:
After that, you can now remove the top cover of your pressure tank.
Step 5:
Once you open the top cover, you can easily pull out the bladder from inside the tank.
Step 6:
Now, you’ll have to buy a replacement bladder as per the instructions from the tank manufacturer.
Step 7:
Then, you can push the bladder back into the pressure tank through the top cover opening.
Step 8:
At last, you can reassemble the tank by putting in all the parts that you just uninstalled in the earlier steps. And, just like that, you’ll be done replacing the bladder of your pressure tank.
What To Do When A New Pressure Tank Is Not Filling With Water?
If your pressure tank is a new one, there’s less chance that this problem is occurring due to hardware issues. Rather, you should check if the water draw-in line is clogged with trash or other contaminants or not.
Sometimes, it just happens that minerals, trash, or contaminants in the water can clog the draw line or the fill line. Consequently, your pressure tank might stop filling with water.
If any clogging does exist in your pressure tank, release the clogging immediately with metal wires or any other thin metallic object.
What Are Some Common Bad Pressure Tank Symptoms?
If you’re not an expert with plumbing, it’s difficult for you to detect whether your pressure tank has gone bad or not. However, I have provided some insights to help you find out if your pressure tank is still working correctly or not.
Below, I have laid down some symptoms that indicate that your pressure tank has gone bad:
1. No water in the tank:
Needless to say, you will not have any water in the tank if your pressure tank is malfunctions.
2. Very frequent bumping cycles:
If your pump has to run more frequently than normal, you should understand that there is stagnant water in your bladder tank. This is the reason why the full volume of the tank is not being utilized. As a result, the tank has to be refilled with the pump very frequently.
3. Air in the faucets:
In some cases, you might notice that no water is flowing from your faucets. This is because there is air in the water line. This is also another symptom of a bad bladder tank.
4. Contaminants in the water:
When the bladder gets filthy and accumulates silt or minerals, it can push in these contaminants through the waterline. In that case, you’ll see that the water coming out of your faucets has trash, silts, filth, or algae.
5. Tank taking very long to fill up:
Sometimes, bladder tanks can go bad due to clogs in the water draw line. In that case, it’ll take way too long for the tank to get filled up.
However, thankfully this issue can be solved by releasing the clog from the water draw line and the water drain line.
6. Very weak flow of water:
If your bladder tank is working correctly, you will have a strong and healthy water flow from your faucets. But, if you notice an unusual decrease in the flow of water, you should understand that your bladder tank is not working properly.
Frequently Asked Questions:
In this subsection, I have provided some related questions that people ask on internet forums. So, don’t forget to check them out below.
If you don’t have any water in your pressure tank, the first thing you should do is turn on the faucet that is the closest to the tank. This step will make sure that no water remains on the pipeline (or the tank).
After that, you have to pump air into the pressure tank using an air compressor. Once an appropriate amount of air has accumulated in the tank, you can turn on the pump and fill the pressure tank with water easily.
Technically speaking, it is okay to add air to the pressure tank while there’s still water in it.
However, if you’re trying to fix the air-to-water ratio of your pressure tank, the best way to go is first emptying the tank. It’s because, in some cases, the tank will not fluently accept the air if the tank is already partially filled with water.
Having an excess amount of air inside a bladder tank will result in having excessive pressure in the tank. As a result, pumping in only a small amount of water will cause the pressure inside the bladder tank to reach the cut-off limit.
Consequently, the pump will turn off without pumping much water into the tank. So, your pump will have to run more short-run cycles to fill the tank with water. This will reduce the lifetime of the pump motor.
Conclusion
Well, that’s all there’s to it, people. Now that you have got a clear understanding of this query, why is my pressure tank not filling up with water? And, you’ve also come to know much more related information regarding this topic.
As you can already guess from the above discussion, fixing up a bad bladder tank is not a DIY job. It’s not right to tinker with a pressure tank if you don’t have any prior knowledge or experience regarding its fixture.
Therefore, whenever your pressure tank is not filling up with water, don’t be hesitant to call in a professional plumber to solve your problem. And try fixing the tank in a DIY method only if you have expertise in this area.
Thank you so much for dropping in today, you guys are the bee’s knees!!!